Chapter 4: The Builder — Visual Editor
How to use the PageGenius Puck editor: add widgets, edit content, manage pages, save, publish, SEO, and translate.
4.1 Builder Layout
+-------------------------------------------------------------------+
|  HEADER BAR                                                       |
|  [← Back]  My Project  [Home] [About] [+]  [💾 Save] [🚀 Pub]   |
+-------------------------------------------------------------------+
|                                                                   |
|  +-- Sidebar (Widgets) ----+  +-- CANVAS (Editing) --------+   |
|  |                          |  |                             |   |
|  | SEARCH                   |  |  ┌─────────────────────┐   |   |
|  | [________________]       |  |  │   HERO              │   |   |
|  |                          |  |  │   Big headline      │   |   |
|  | WIDGETS                  |  |  │   [Button]            │   |   |
|  | [Hero] [Text] [Button]   |  |  └─────────────────────┘   |   |
|  | [Map] [Form] [FAQ] ...   |  |  ┌─────────────────────┐   |   |
|  |                          |  |  │   SERVICES          │   |   |
|  |                          |  |  │   • Service 1        │   |   |
|  |                          |  |  │   • Service 2        │   |   |
|  |                          |  |  └─────────────────────┘   |   |
|  |                          |  |  ┌─────────────────────┐   |   |
|  |                          |  |  │   FORM              │   |   |
|  |                          |  |  │   [Name________]   │   |   |
|  |                          |  |  │   [Email________]  │   |   |
|  |                          |  |  │   [Submit]          │   |   |
|  |                          |  |  └─────────────────────┘   |   |
|  +--------------------------+  +----------------------------+   |
|                                                                   |
|  FOOTER BAR                                                       |
|  [Preview]  [Publish]  ⚙️ Config  🤖 AI Assistant                |
+-------------------------------------------------------------------+
Zones explained
| Zone | What it does |
|---|---|
| Header bar | Navigate between project pages, save button, publish button |
| Sidebar | List of available widgets. Drag to the canvas to add them. |
| Canvas | The editing area. Here you see your page as it will appear live. |
| Footer bar | Global actions: preview, publish, SEO settings, AI assistant |
Real screenshot: 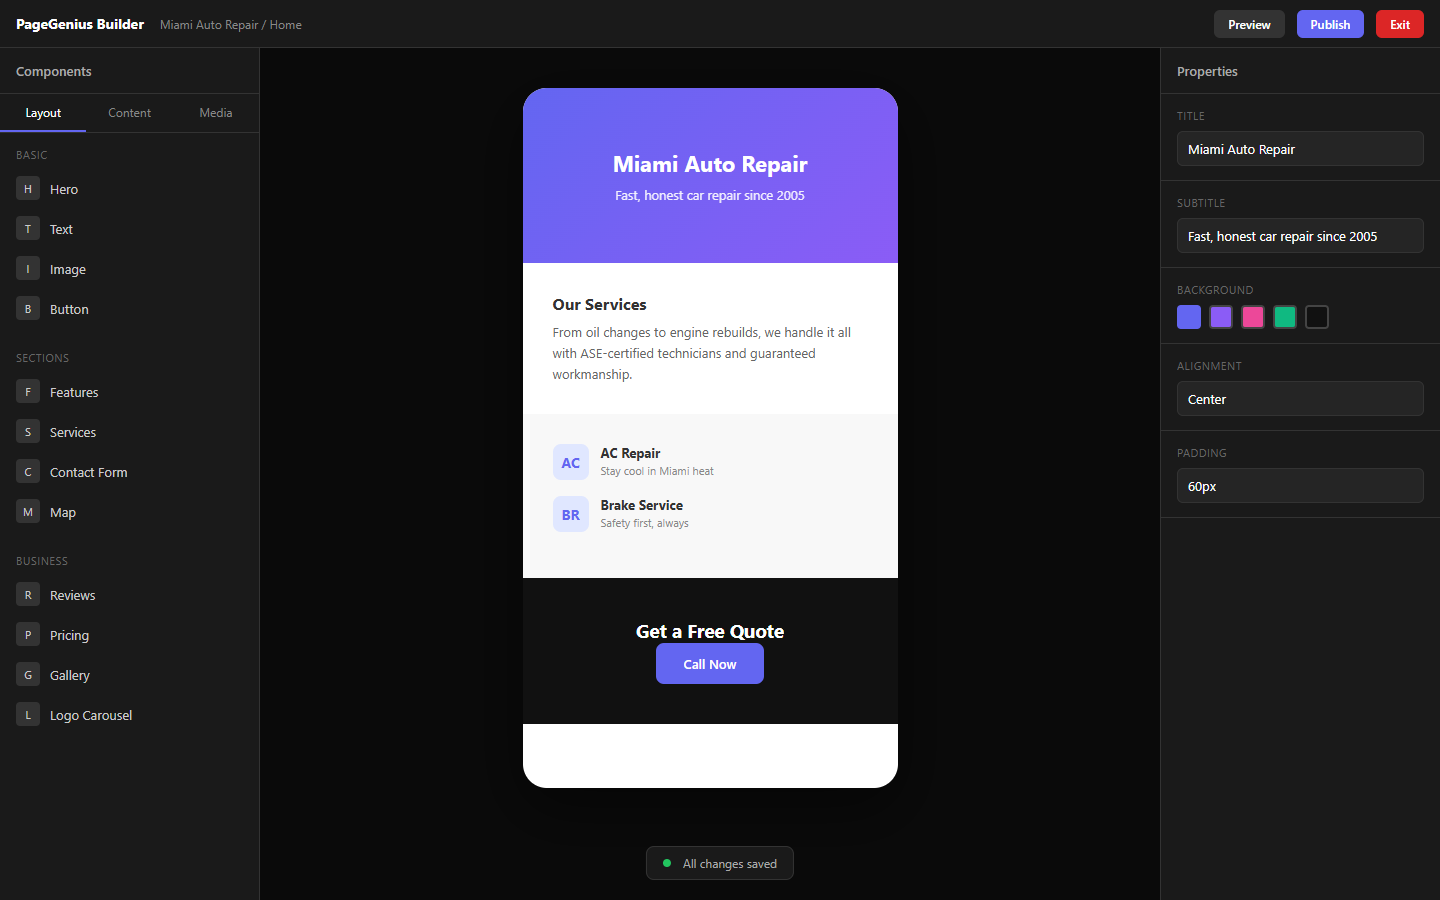
4.2 Adding Widgets to the Canvas
Method 1: Drag and Drop
- In the sidebar, grab a widget (e.g., "Hero")
- Drag it to the canvas
- Drop it where you want it (top, bottom, or between other widgets)
Method 2: Click to Add
- Click a widget in the sidebar
- It's automatically added to the end of the canvas
- Then move it by dragging
Reordering widgets
On the canvas, each widget has a handle (two horizontal lines ☰) in the top left corner. Grab that handle and drag the widget up or down.
4.3 Editing a Widget
Click any widget on the canvas. A right-side panel opens with that widget's properties.
Typical properties structure
+-- Properties Panel --------+
|  HERO                       |
|                             |
|  Content                    |
|  Title: [Business title]    |
|  Subtitle: [Subtitle]       |
|  Button text: [Call Now]    |
|  Button link: [tel:+1234]   |
|                             |
|  Style                      |
|  Variant: [Gradient Blue ▼] |
|  Align: [Center ▼]          |
|  Background: [Image ▼]      |
|                             |
|  Actions                    |
|  [🗑 Delete] [📋 Duplicate]   |
+-----------------------------+
Property field types
| Type | What it does | Example |
|---|---|---|
| Text input | Type free text | Title, subtitle, CTA |
| Textarea | Long text | Description, paragraph |
| Dropdown | Choose from a list | Style variant, alignment |
| Toggle | On/off | Show/hide an element |
| Number | Numeric value | Font size, spacing |
| Color picker | Choose color | Background, text color |
| Image upload | Upload or pick image | Logo, background, photo |
| Link | URL or tel/email | Button, map, social |
| Array/List | List of items | Services, testimonials, FAQs |
4.4 Multiple Pages
PageGenius supports real multi-page sites.
Create a new page
- In the header bar, click the "+" next to the tabs
- Enter the page name: "About", "Services", "Contact"
- Choose whether you want:
- Blank page
- Generate with AI (the AI builds the page based on your project)
- Click "Create"
Switch between pages
Click on the tab of the page you want to edit. The canvas updates instantly.
Reorder pages
Drag the tabs left/right to change the order. This affects:
- The navigation order on the published site
- The order in sitemap.xml
Rename a page
- Right-click on the tab → "Rename"
- Or: click ⚙️ Config → Pages → edit the name
Delete a page
- Right-click on the tab → "Delete"
- Confirmation: "Delete 'About' and all its content?"
Note: You cannot delete the Home page. It's mandatory.
Slug / Path of the page
Each page has a URL within your project:
- Home →
/(root) - About →
/about - Services →
/services - Contact →
/contact
To change it: ⚙️ Config → Pages → edit the "Path" field.
4.5 Save vs. Publish
| Action | What it does | Who sees it | Where it stays |
|---|---|---|---|
| Save | Saves changes to the database | Only you (in the builder) | Draft |
| Publish | Generates static HTML and puts it live | Everyone | Live site |
Save (Ctrl/Cmd + S)
- Auto-saves every 3 seconds if you're editing
- Also saves manually with
Ctrl/Cmd + S - A green toast says "Saved" when complete
Publish (Ctrl/Cmd + P)
- Click "Publish" (or
Ctrl/Cmd + P) - Select which pages to publish (default: all)
- Click "Confirm"
- Wait 5-15 seconds while HTML is generated
- We show you the live URL: ``` https://slug.mypagegenius.com https://slug.mypagegenius.com/about https://slug.mypagegenius.com/services https://slug.mypagegenius.com/contact ```
What publishing includes:
- Optimized static HTML (no React, no heavy server)
- Inline CSS (loads instantly, no waiting for external files)
- Minimal JavaScript: mobile menu, forms, analytics, scroll-reveal
- Automatic Schema.org JSON-LD (for Google)
- Automatic sitemap.xml and robots.txt
- WebP images with srcset (adapts to screen size)
- Favicon and meta tags (OG image for social media)
- Automatic Header and Footer on all pages
4.6 SEO Settings
Click ⚙️ Config → SEO.
Per-page fields
| Field | What it does | Example | |
|---|---|---|---|
| Title | Title that appears on Google | "Miami Auto Shop | Brakes and AC Repair" |
| Meta Description | Summary on Google (max 155 chars) | "Auto repair shop in Miami with 15 years of experience. We fix brakes, air conditioning, and transmissions. Free estimate." | |
| Canonical URL | Official URL (prevents duplicate content) | https://myshop.com/services | |
| OG Image | Image that appears when sharing on Facebook/LinkedIn | Upload a 1200x630px image |
Global SEO (Business Info)
Click ⚙️ Config → Business Info.
| Field | What it does | Why it matters |
|---|---|---|
| Business Name | Your business name | Appears in Schema.org and Google |
| Type | LocalBusiness subtype | Google uses this to show "Dentist", "Auto Shop", etc. |
| Phone | Contact number | Click-to-call on mobile |
| Contact email | Form submissions go here | |
| Address | Full address | Appears on Google Maps and Schema |
| Hours | Opening hours | Google shows "Open now" |
| Services | List of services | Google indexes each service as a keyword |
PageGenius generates Schema.org automatically from this data. You don't have to touch code.
4.7 AI Assistant in the Builder
Click 🤖 AI Assistant in the footer bar.
What it can do
| Command | Result |
|---|---|
| "Regenerate this section" | The AI rewrites the texts of the selected widget |
| "Make it more persuasive" | Improves conversion copy |
| "Add fake testimonials" | Generates 3 realistic testimonials for your industry |
| "Translate this page" | Translates all content on the current page |
Limitations
- It cannot change widget structure (only texts)
- It cannot upload images
- It cannot modify global colors or styles
4.8 Copy / Paste Widgets
PageGenius allows copying and pasting widgets between pages.
- Click on a widget → "Copy" (or
Ctrl/Cmd + C) - Go to another page (e.g., from Home to About)
- Click on the canvas where you want to paste →
Ctrl/Cmd + V
What gets copied:
- ✅ All widget content
- ✅ Style configuration
- ❌ Uploaded images (they're referenced, not duplicated)
4.9 Builder Problems and Solutions
"I can't add more widgets"
- Cause: You've reached the widget limit per page (50 on Free, 100 on Pro/Agency).
- Solution: Delete unused widgets, or upgrade your plan.
"The widget I added doesn't show"
- Cause: The widget is "collapsed" (no content) or has text color equal to the background.
- Solution: Click on the widget and fill in the required fields (title, text, etc.).
"I saved but changes don't appear live"
- Cause: You saved but did NOT publish. The live site still has the previous version.
- Solution: Click "Publish". Save ≠ Publish.
"Publishing failed"
- Cause: Rendering error in some widget, or server timeout.
- Solution: Check that no widgets have empty required fields. If it persists, contact support.
"The builder feels slow"
- Cause: Too many heavy widgets (galleries with many images, videos, carousels).
- Solution: Reduce the number of images per gallery. Compress images before uploading.
"I can't find a widget"
- Cause: The widget is in the wrong category or is "Premium" and your plan is Free.
- Solution: Use the sidebar search. If it doesn't appear, it might require an upgrade.
"I want to undo a change"
- Solution:
Ctrl/Cmd + Z. The builder has unlimited undo/redo.
"My page looks different in the builder vs. the published site"
- Cause: The builder uses a preview mode. Some styles render slightly differently live.
- Solution: Use "Preview" (button in footer bar) to see exactly how it will look live.
Chapter 4 Summary
| Task | How | Shortcut |
|---|---|---|
| Add widget | Drag from sidebar to canvas | — |
| Edit widget | Click widget → right panel | — |
| Move widget | Grab handle ☰ and drag | — |
| New page | Header → "+" | — |
| Save | Button or Ctrl+S | Ctrl/Cmd+S |
| Publish | Button or Ctrl+P | Ctrl/Cmd+P |
| SEO | ⚙️ Config → SEO | — |
| AI Assistant | 🤖 in footer bar | — |
| Copy/paste widget | Ctrl+C / Ctrl+V | Ctrl/Cmd+C, Ctrl/Cmd+V |
Next chapter: Chapter 5: Widgets Reference